Spring Boot + Layui 使用 Easy Poi 优雅地进行 Excel 导入
业务情景
除了常规的表单录入,还需提供基于 Excel 模板进行导入,并提供数据验证。每次的导入量不超过300条。
下面以一个 物料-供应商 管理系统为例,物料与供应商是多对一关系,供应商和物料分别导入。
供应商实体类定义:
 1
 2
 3
 4
 5
 6
 7
 8
 9
10
11
12
13
14
15
16
17
18
19
20
21
22
23
/**
* 供应商编号
*/
@TableId ( value = "id" , type = IdType . AUTO )
private Long id ;
/**
* 供应商名称
*/
@TableField ( "name" )
private String name ;
/**
* 供应商电话
*/
@TableField ( "phone" )
private String phone ;
/**
* 交货日期
*/
@TableField ( "deliver_at" )
private Date deliverAt ;
物料实体类定义:
 1
 2
 3
 4
 5
 6
 7
 8
 9
10
11
12
13
14
15
16
17
18
19
20
21
22
23
24
25
26
27
28
29
30
31
32
33
34
35
/**
* 物料编号
*/
@TableId ( value = "id" , type = IdType . AUTO )
private Long id ;
/**
* 物料型号
*/
@TableField ( "model" )
private String model ;
/**
* 定高/定宽选项
*/
@TableField ( "height_or_width" )
private Boolean heightOrWidth ;
/**
* 定高
*/
@TableField ( "height" )
private BigDecimal height ;
/**
* 定宽
*/
@TableField ( "width" )
private BigDecimal width ;
/**
* 供应商编号
*/
@TableField ( "supplier_id" )
private Long supplierId ;
实现思路
Apache POI 和 Alibaba EasyExcel 都是优秀的 MS Office 文档读写工具,在此记录另一个好用的国产 POI 工具 Easy Poi 的导入用法。选择 Easy Poi 的原因之一是官方文档相对更完整,而且是中文文档。
Easy Poi 旧版文档 | 新版文档
由于本项目开发中只涉及单表导入,一对多等其他非单表结构在此仅谈及思路。
Easy Poi 提供了便捷的注解导入方法,在实体类需要导入的字段添加 @Excel 注解即可与 Excel 模板中的列绑定。
从上文实体类中可见,需要导入的字段涉及多种类型,要知道 Excel 中录入的只是普通的文本,由于用户输入的不确定性,就必须提前考虑到转成 Java 类型并存入数据库过程中可能出现的问题,例如要求输入数字而不能是其它字符,输入的日期必须按照某种格式等等,因此需要在录入时和入库前做数据校验。
Easy Poi 提供的数据验证包含 JSR-303 规范(Bean Validation)和自定义校验接口 IExcelVerifyHandler 两种。
Bean Validation 中内置的 Constraint:
Constraint
详细信息
@Null
被注释的元素必须为 null
@NotNull
被注释的元素必须不为 null
@AssertTrue
被注释的元素必须为 true
@AssertFalse
被注释的元素必须为 false
@Min(value)
被注释的元素必须是一个数字,其值必须大于等于指定的最小值
@Max(value)
被注释的元素必须是一个数字,其值必须小于等于指定的最大值
@DecimalMin(value)
被注释的元素必须是一个数字,其值必须大于等于指定的最小值
@DecimalMax(value)
被注释的元素必须是一个数字,其值必须小于等于指定的最大值
@Size(max, min)
被注释的元素的大小必须在指定的范围内
@Digits (integer, fraction)
被注释的元素必须是一个数字,其值必须在可接受的范围内
@Past
被注释的元素必须是一个过去的日期
@Future
被注释的元素必须是一个将来的日期
@Pattern(value)
被注释的元素必须符合指定的正则表达式
IExcelVerifyHandler 接口定义:
 1
 2
 3
 4
 5
 6
 7
 8
 9
10
11
public interface IExcelVerifyHandler < T > {
/**
* 导入校验方法
*
* @param obj 当前对象
* @return
*/
public ExcelVerifyHanlderResult verifyHandler ( T obj );
}
自定义导入校验的好处是,可以自己添加查重、插入、判空等规则,也可以对用户录入的内容进行规范化和转换。
一对多的实现:对实体类集合字段标注 @ExcelCollection 注解即可。
具体实现
步骤一:设计 Excel 模板
供应商导入 Excel 模板:
物料导入 Excel 模板:
以上模板表头为 斜体 的字段是必填项。
由于后期需要做导入验证,为了减低后台验证压力,大部分验证可以于用户录入时使用 Excel 自带的单元格格式和数据验证。
交货日期 可以自定义一整列的单元格格式为 yyyy-mm-dd
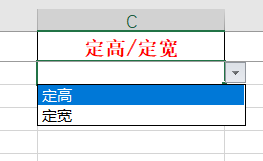
定高/定宽 必须填 定高 或者 定宽,可以通过 Excel - 数据 - 数据验证 中设置下拉选项,如下图配置验证:
数据验证配置
最终可获得如下效果:
下拉效果
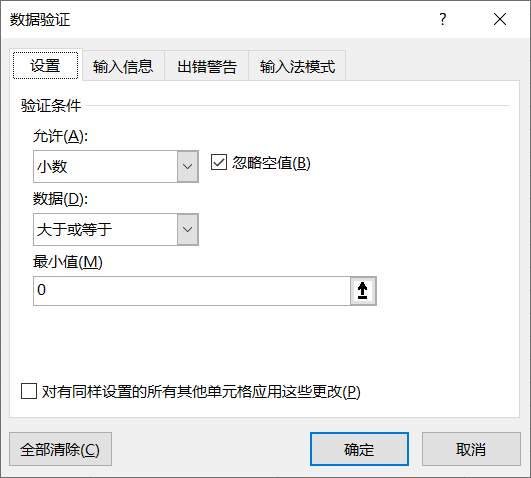
定高 和 定宽 均为数字类型,要求保留三位小数,可以直接通过设置单元格格式控制三位小数;另外还需要在数据验证中设置只允许输入数字,且必须为非负数,如下图配置验证:
数据验证配置
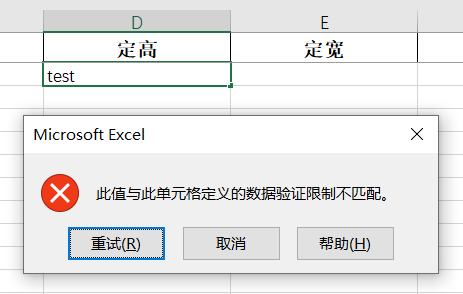
输入非数字字符将弹出警告,要求重试:
警告提示重试
供应商 在数据库中为 id 外键,在 Excel 中需要录入供应商的名称,具体处理方法见下文
步骤二:引入 POM
对于 Spring Boot 项目,需要在 pom.xml 引入 easypoi-spring-boot-starter 和 easypoi 其他包。
 1
 2
 3
 4
 5
 6
 7
 8
 9
10
11
12
13
14
15
16
17
18
19
20
<dependency>
<groupId> cn.afterturn</groupId>
<artifactId> easypoi-spring-boot-starter</artifactId>
<version> 4.4.0</version>
</dependency>
<dependency>
<groupId> cn.afterturn</groupId>
<artifactId> easypoi-base</artifactId>
<version> 4.4.0</version>
</dependency>
<dependency>
<groupId> cn.afterturn</groupId>
<artifactId> easypoi-web</artifactId>
<version> 4.4.0</version>
</dependency>
<dependency>
<groupId> cn.afterturn</groupId>
<artifactId> easypoi-annotation</artifactId>
<version> 4.4.0</version>
</dependency>
步骤三:修改实体类
为需要导入的字段标注 @Excel 注解。
修改供应商实体类:
 1
 2
 3
 4
 5
 6
 7
 8
 9
10
11
12
13
14
15
16
17
18
19
20
21
22
23
24
25
26
/**
* 供应商编号
*/
@TableId ( value = "id" , type = IdType . AUTO )
private Long id ;
/**
* 供应商名称
*/
@Excel ( name = "供应商名称" , isImportField = "true" )
@TableField ( "name" )
private String name ;
/**
* 供应商电话
*/
@Excel ( name = "供应商电话" , isImportField = "true" )
@TableField ( "phone" )
private String phone ;
/**
* 交货日期
*/
@Excel ( name = "交货日期" , format = "yyyy-MM-dd HH:mm:ss" )
@TableField ( "deliver_at" )
private Date deliverAt ;
修改物料实体类:
 1
 2
 3
 4
 5
 6
 7
 8
 9
10
11
12
13
14
15
16
17
18
19
20
21
22
23
24
25
26
27
28
29
30
31
32
33
34
35
36
37
38
39
40
41
42
43
44
45
46
/**
* 物料编号
*/
@TableId ( value = "id" , type = IdType . AUTO )
private Long id ;
/**
* 物料型号
*/
@Excel ( name = "物料型号" , isImportField = "true" )
@TableField ( "model" )
private String model ;
/**
* 定高/定宽选项
*/
@Excel ( name = "定高/定宽" , replace = { "定高_true" , "定宽_false" }, isImportField = "true" )
@TableField ( "height_or_width" )
private Boolean heightOrWidth ;
/**
* 定高
*/
@Excel ( name = "定高" , isImportField = "true" )
@TableField ( "height" )
private BigDecimal height ;
/**
* 定宽
*/
@Excel ( name = "宽" , isImportField = "true" )
@TableField ( "width" )
private BigDecimal width ;
/**
* 供应商编号
*/
@TableField ( "supplier_id" )
private Long supplierId ;
/**
* 供应商名称
*/
@Excel ( name = "供应商" , isImportField = "true" )
@TableField ( exist = false )
private String supplierName ;
name 属性值必须与 Excel 模板中的表头名完全一致isImportField 属性可以校验 Excel 模板的正确性和完整性,如果某字段标注了该属性值为 true,在导入时 Easy Poi 将根据 name 属性值寻找 Excel 模板中对应的列,找不到列或者名字不一致说明该模板不合法。可用于判别用户上传的 Excel 文件是否对应待录入的表单format 属性包含了 importFormat 和 exportFormat 两个属性,用于格式化导入和导出的时间格式replace 属性用于替换值,比如 Boolean 类型的 true/false 可以用中文录入,最终记录的是替换后的布尔值供应商 字段应有别于数据库中的供应商编号外键,需要添加一个新的供应商名称字段,从 Excel 模板中读取的 供应商 将记录到该字段
步骤四:导入验证
为了方便记录验证出错原因和定位出错的行数,需要在实体类中添加如下两个字段:
 1
 2
 3
 4
 5
 6
 7
 8
 9
10
11
/**
* 导入错误信息
*/
@TableField ( exist = false )
private String errorMsg ;
/**
* 导入错误所在行数
*/
@TableField ( exist = false )
private Integer rowNum ;
实现 IExcelVerifyHandler 接口
供应商类导入校验:
 1
 2
 3
 4
 5
 6
 7
 8
 9
10
11
12
13
14
15
16
17
18
19
20
21
22
23
24
25
26
27
28
29
30
@Component
public class SupplierExcelVerifyHandler implements IExcelVerifyHandler < Supplier > {
@Override
public ExcelVerifyHandlerResult verifyHandler ( Supplier supplier ) {
ExcelVerifyHandlerResult result = new ExcelVerifyHandlerResult ( true );
// 在此添加查重规则
// 如果一行为空设置成功,否则设置失败
if ( StringUtils . isBlank ( supplier . toString ())) {
result . setSuccess ( true );
return result ;
} else if ( StringUtils . isBlank ( supplier . getName ())) {
result . setSuccess ( false );
result . setMsg ( "供应商名称不能为空" );
return result ;
} else if ( StringUtils . isBlank ( supplier . getPhone ())) {
result . setSuccess ( false );
result . setMsg ( "供应商电话不能为空" );
return result ;
}
result . setSuccess ( true );
// 数据注入
if ( result . isSuccess ()) {
// 在此添加 Service 中的插入方法
}
return result ;
}
}
物料类导入校验:
 1
 2
 3
 4
 5
 6
 7
 8
 9
10
11
12
13
14
15
16
17
18
19
20
21
22
23
24
25
26
27
28
29
30
31
32
33
34
35
36
37
38
39
40
41
42
43
44
45
46
47
48
49
50
51
52
53
@Component
public class ItemExcelVerifyHandler implements IExcelVerifyHandler < Item > {
@Override
public ExcelVerifyHandlerResult verifyHandler ( Item item ) {
ExcelVerifyHandlerResult result = new ExcelVerifyHandlerResult ( true );
// 根据供应商名称转换id
if ( StringUtils . isNotBlank ( item . getSupplierName ())) {
Long supplierId ;
// 在此添加 Service 查找 id 方法
if ( supplierId == null ) {
result . setSuccess ( false );
result . setMsg ( "供应商不存在,请先在“供应商管理”录入该供应商" );
return result ;
}
item . setSupplierId ( supplierId );
}
// 在此添加查重规则
// 如果一行为空设置成功,否则设置失败
if ( StringUtils . isBlank ( item . toString ())) {
result . setSuccess ( true );
return result ;
} else if ( StringUtils . isBlank ( item . getModel ())) {
result . setSuccess ( false );
result . setMsg ( "物料型号不能为空" );
return result ;
} else if ( item . getHeightOrWidth () == null ) {
result . setSuccess ( false );
result . setMsg ( "定高/定宽不能为空" );
return result ;
} else if ( item . getHeightOrWidth () && item . getHeight () == null ) {
result . setSuccess ( false );
result . setMsg ( "定高不能为空" );
return result ;
} else if (! item . getHeightOrWidth () && item . getWidth () == null ) {
result . setSuccess ( false );
result . setMsg ( "定宽不能为空" );
return result ;
} else if ( StringUtils . isBlank ( item . getSupplierName ())) {
result . setSuccess ( false );
result . setMsg ( "供应商不能为空" );
return result ;
}
result . setSuccess ( true );
// 数据注入
if ( result . isSuccess ()) {
// 在此添加 Service 中的插入方法
}
return result ;
}
}
为什么不使用 Bean Validation 注解? 比如使用 @NotNull 注解判空,固然方便,但是当两行内容中间出现空行,会当成空白处理报错;另外,一些别的复杂规则不如使用自定义验证舒服为什么使用 StringUtils.isBlank() 方法判空? 要使用这个方法,首先需要提前导入 commons-lang3 这个包。因为 StringUtils.isBlank() 可以对 null、""、" " 三种情况一次性校验,连空格都被算为空处理,能避免类型转换或者运算处理时出现的错误何时插入验证通过的数据? 首先 Easy Poi 的校验机制是读一行验一行,验证后将视验证结果的情况分为 success: true 和 success: false 两类,结果会分别保存到 ExcelImportResult 类中的 list 和 failList 。现有两种方法,第一种是验一行插一条,第二种是全部验完后再插入。第一种如上述代码所示,效率不高,适合少量数据导入;第二种需要遍历一次 list 再逐条插入,数据量大的情况不合适
步骤五:定义导入接口
以供应商类为例,其它同理:
 1
 2
 3
 4
 5
 6
 7
 8
 9
10
11
12
13
14
15
16
17
18
19
20
21
22
23
24
25
26
27
28
29
30
31
32
33
34
35
@RequestMapping ( "/upload" )
@ResponseBody
public ResponseData upload ( @RequestPart ( "file" ) MultipartFile file ) {
// 导入参数
ImportParams importParams = new ImportParams ();
importParams . setNeedVerify ( true );
importParams . setVerifyHandler ( supplierExcelVerifyHandler );
ExcelImportResult < Supplier > result ;
try {
result = ExcelImportUtil . importExcelMore ( file . getInputStream (), Supplier . class , importParams );
} catch ( Exception e ) {
return ResponseData . error ( 400 , e . getMessage ());
}
// 错误信息
StringBuilder errMsg = new StringBuilder ();
// Excel导入校验
if ( result . isVerfiyFail ()) {
errMsg . append ( "成功:" )
. append ( result . getList (). size ())
. append ( " 个,失败:" )
. append ( result . getFailList (). size ())
. append ( " 个" )
. append ( "<br/>" );
for ( Supplier supplier : result . getFailList ()) {
errMsg . append ( "第 " )
. append ( supplier . getRowNum () + 1 )
. append ( " 行数据有误:" )
. append ( supplier . getErrorMsg ())
. append ( "<br/>" );
}
System . out . println ( errMsg );
return ResponseData . error ( 400 , errMsg . toString ());
}
return ResponseData . success ();
}
导入的核心操作是通过 importExcelMore(InputStream inputstream, Class<?> pojoClass, ImportParams params) 方法实现的,其中 ImportParams 是导入配置的参数,可以设置 headRows 表头行数,needVerify 是否需要验证,verifyHandler 自定义验证处理对象等等。此处需要特别注意,正确设置 titleRows、headRows、startRows 才能正确读取完整的数据,按本例的情况只需要维持默认即可。
以下是 ImportParams 类的源码:
  1
  2
  3
  4
  5
  6
  7
  8
  9
 10
 11
 12
 13
 14
 15
 16
 17
 18
 19
 20
 21
 22
 23
 24
 25
 26
 27
 28
 29
 30
 31
 32
 33
 34
 35
 36
 37
 38
 39
 40
 41
 42
 43
 44
 45
 46
 47
 48
 49
 50
 51
 52
 53
 54
 55
 56
 57
 58
 59
 60
 61
 62
 63
 64
 65
 66
 67
 68
 69
 70
 71
 72
 73
 74
 75
 76
 77
 78
 79
 80
 81
 82
 83
 84
 85
 86
 87
 88
 89
 90
 91
 92
 93
 94
 95
 96
 97
 98
 99
100
101
102
103
104
@Data
public class ImportParams extends ExcelBaseParams {
public static final String SAVE_URL = "/excel/upload/excelUpload" ;
/**
* 表格标题行数,默认0
*/
private int titleRows = 0 ;
/**
* 表头行数,默认1
*/
private int headRows = 1 ;
/**
* 字段真正值和列标题之间的距离 默认0
*/
private int startRows = 0 ;
/**
* 主键设置,如何这个cell没有值,就跳过 或者认为这个是list的下面的值
* 大家不理解,去掉这个
*/
private Integer keyIndex = null ;
/**
* 开始读取的sheet位置,默认为0
*/
private int startSheetIndex = 0 ;
/**
* 上传表格需要读取的sheet 数量,默认为1
*/
private int sheetNum = 1 ;
/**
* 是否需要保存上传的Excel,默认为false
*/
private boolean needSave = false ;
/**
* 校验组
*/
private Class [] verifyGroup = null ;
/**
* 是否需要校验上传的Excel,默认为false
*/
private boolean needVerify = false ;
/**
* 校验处理接口
*/
private IExcelVerifyHandler verifyHandler ;
/**
* 保存上传的Excel目录,默认是 如 TestEntity这个类保存路径就是
* upload/excelUpload/Test/yyyyMMddHHmss_***** 保存名称上传时间_五位随机数
*/
private String saveUrl = SAVE_URL ;
/**
* 最后的无效行数
*/
private int lastOfInvalidRow = 0 ;
/**
* 手动控制读取的行数
*/
private int readRows = 0 ;
/**
* 导入时校验数据模板,是不是正确的Excel
*/
private String [] importFields ;
/**
* 导入时校验excel的标题列顺序。依赖于importFields的配置顺序
*/
private boolean needCheckOrder = false ;
/**
* Key-Value 读取标记,以这个为Key,后面一个Cell 为Value,多个改为ArrayList
*/
private String keyMark = ":" ;
/**
* 按照Key-Value 规则读取全局扫描Excel,但是跳过List读取范围提升性能
* 仅仅支持titleRows + headRows + startRows 以及 lastOfInvalidRow
*/
private boolean readSingleCell = false ;
/**
* 是否并行计算
*/
private boolean concurrentTask = false ;
/**
* 最小截取大小
*/
private Integer critical = 1000 ;
}
步骤六:前端处理
以 Layui 为例,使用自带的 upload 模块完成模板上传操作。上传的具体参数详见 [官方文档](图片/文件上传模块文档 - Layui ) 。
 1
 2
 3
 4
 5
 6
 7
 8
 9
10
11
12
13
14
15
16
17
18
19
20
21
22
23
24
25
26
27
28
29
layui . use ([ 'admin' , 'upload' ], () => {
let admin = layui . admin
let upload = layui . upload
// 通过模板导入
upload . render ({
elem : '#btnUpload'
, url : path + '/upload'
, accept : 'file'
, acceptMime : 'application/vnd.ms-excel, application/vnd.openxmlformats-officedocument.spreadsheetml.sheet'
, exts : 'xls|xlsx'
, before : function () {
layer . msg ( '上传中' , { icon : 16 , shade : 0.01 })
}
, done : function ( res ) {
layer . closeAll ( 'loading' )
if ( res . code === 200 ) {
Feng . success ( "导入成功!" )
// 数据载入表格
admin . putTempData ( 'formOk' , true )
admin . closeThisDialog ()
} else {
layer . confirm ( res . message , { icon : 5 , title : '导入出错' })
// 将导入成功的部分载入表格
admin . putTempData ( 'formOk' , true )
}
}
})
})
这里有两个状态需要定义:
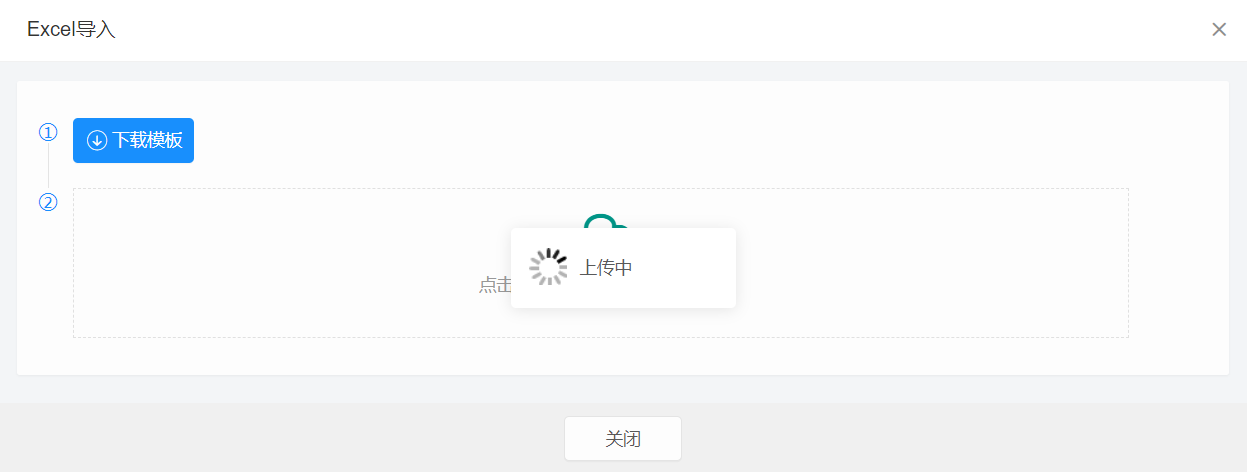
一个是 before 状态,是文件上传前的回调,一般用于上传完毕前的 loading。这里做了一个显示“上传中”的弹出层
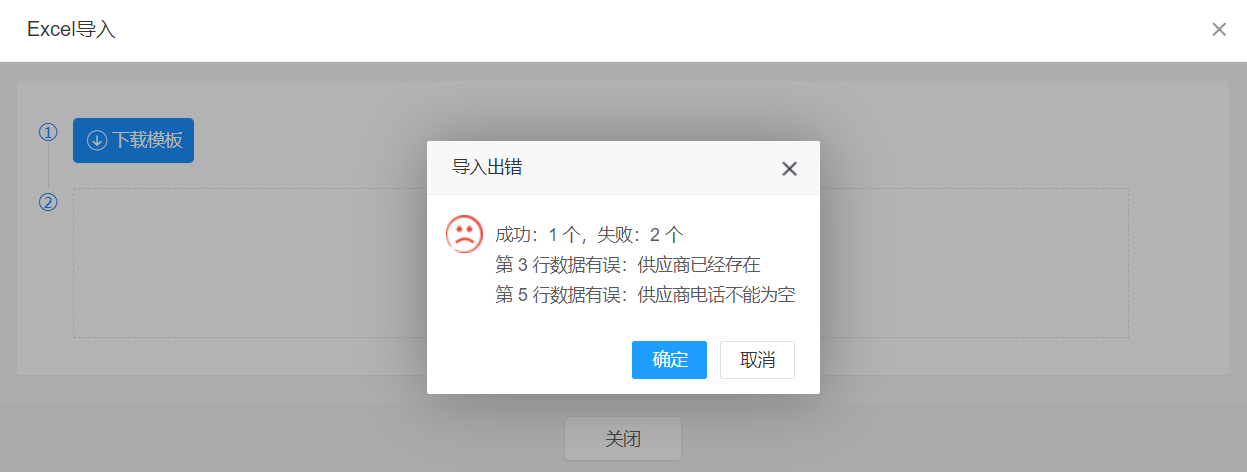
另一个是 done 状态,是上传接口请求成功的回调,需要区分的是接口请求成功不等于文件上传成功。这里通过后端返回的状态码判断是否导入成功,在前端做出反馈前,需要把 loading 的弹窗关闭,再显示导入结果。
导入效果如下:
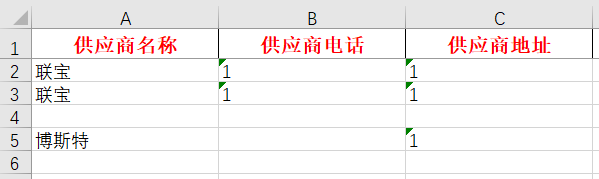
录入 Excel 模板,包含三条有效数据和一行空行,其中第三行与第二行重复,第五行缺了“供应商电话”。
录入 Excel 模板
将模板上传到服务器,处理时将显示“上传中”的弹出层。
上传过程
上传完成后,返回导入结果,具体显示了成功数、失败数和出错原因。如果不存在错误,上传完成后将自动返回表格并刷新数据。
导入结果
总结
Easy Poi 在处理 Excel 模板导入的数据读取、数据校验、结果分类方面使 POI 小白也能得心应手。本文仅介绍了最基本的单表文本数据导入,未涉及到图片导入、一对多甚至多对多的导入等更复杂的处理。由于 Easy Poi 目前只是靠爱发电,追求更稳定的生产场景个人还是建议使用 Apache POI 。
下篇将介绍如何使用 Easy Poi 进行 Excel 导出,以及一些复杂导出情景的解决方案。